Complete ZeroTier Setup Guide for iOS: Remote Server Access
Step-by-step guide to setting up ZeroTier on iOS for remote server access with VybeCoding. Learn the critical two-step setup process that's often overlooked, including VPN configuration in iOS Settings.
ZeroTier is a software-defined network that lets you access your home server, home lab, or work machines from anywhere as if you were on the same local network. Combined with VybeCoding, ZeroTier enables secure remote SSH access to your servers without exposing them to the public internet. However, ZeroTier setup on iOS has a critical two-step process that many users miss, leading to connection failures even when everything appears configured correctly.
The Critical Two-Step Setup Process
ZeroTier on iOS requires both the ZeroTier One app AND proper VPN configuration in iOS Settings. Many users install the app, add their network ID, and assume they're done, but without enabling ZeroTier as a VPN in iOS Settings, no traffic will actually route through the ZeroTier network. Both steps are essential and neither works without the other.
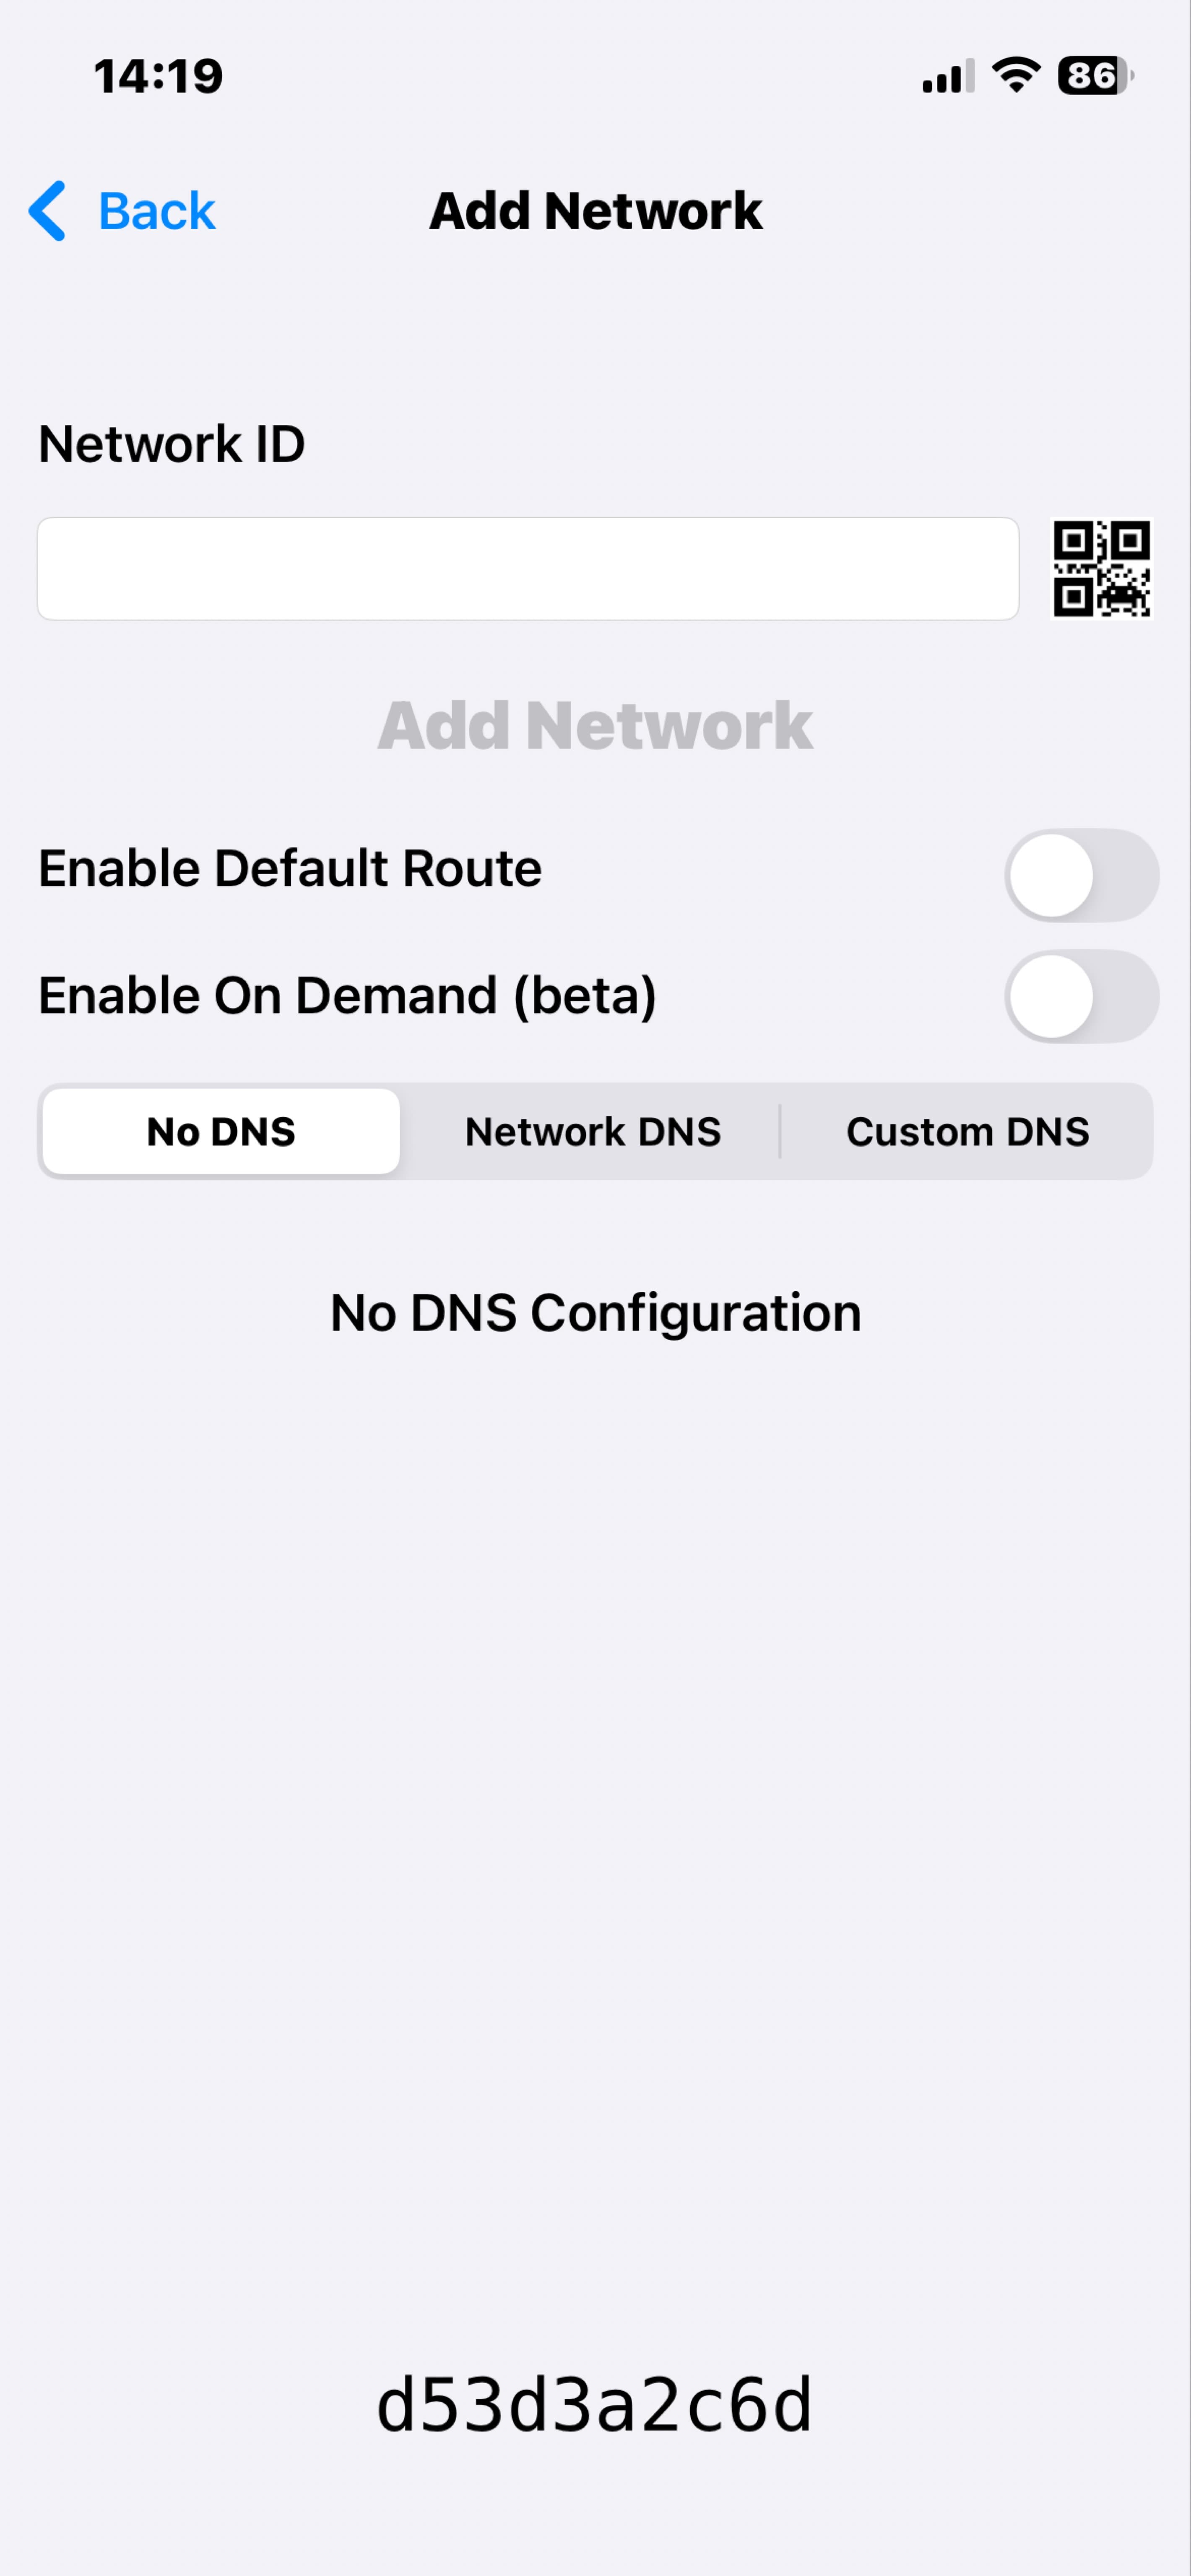
Step 1: Install and Configure ZeroTier One App
Download the ZeroTier One app from the App Store. Open the app and tap 'Add Network' (the plus button). Enter your ZeroTier Network ID, this is the 16-character ID from your ZeroTier Central dashboard (e.g., d53d3a2c6d). The network will appear in your list, but it won't be functional yet. You'll see the network status as 'Requesting Configuration' or similar. This is normal and expected at this stage.
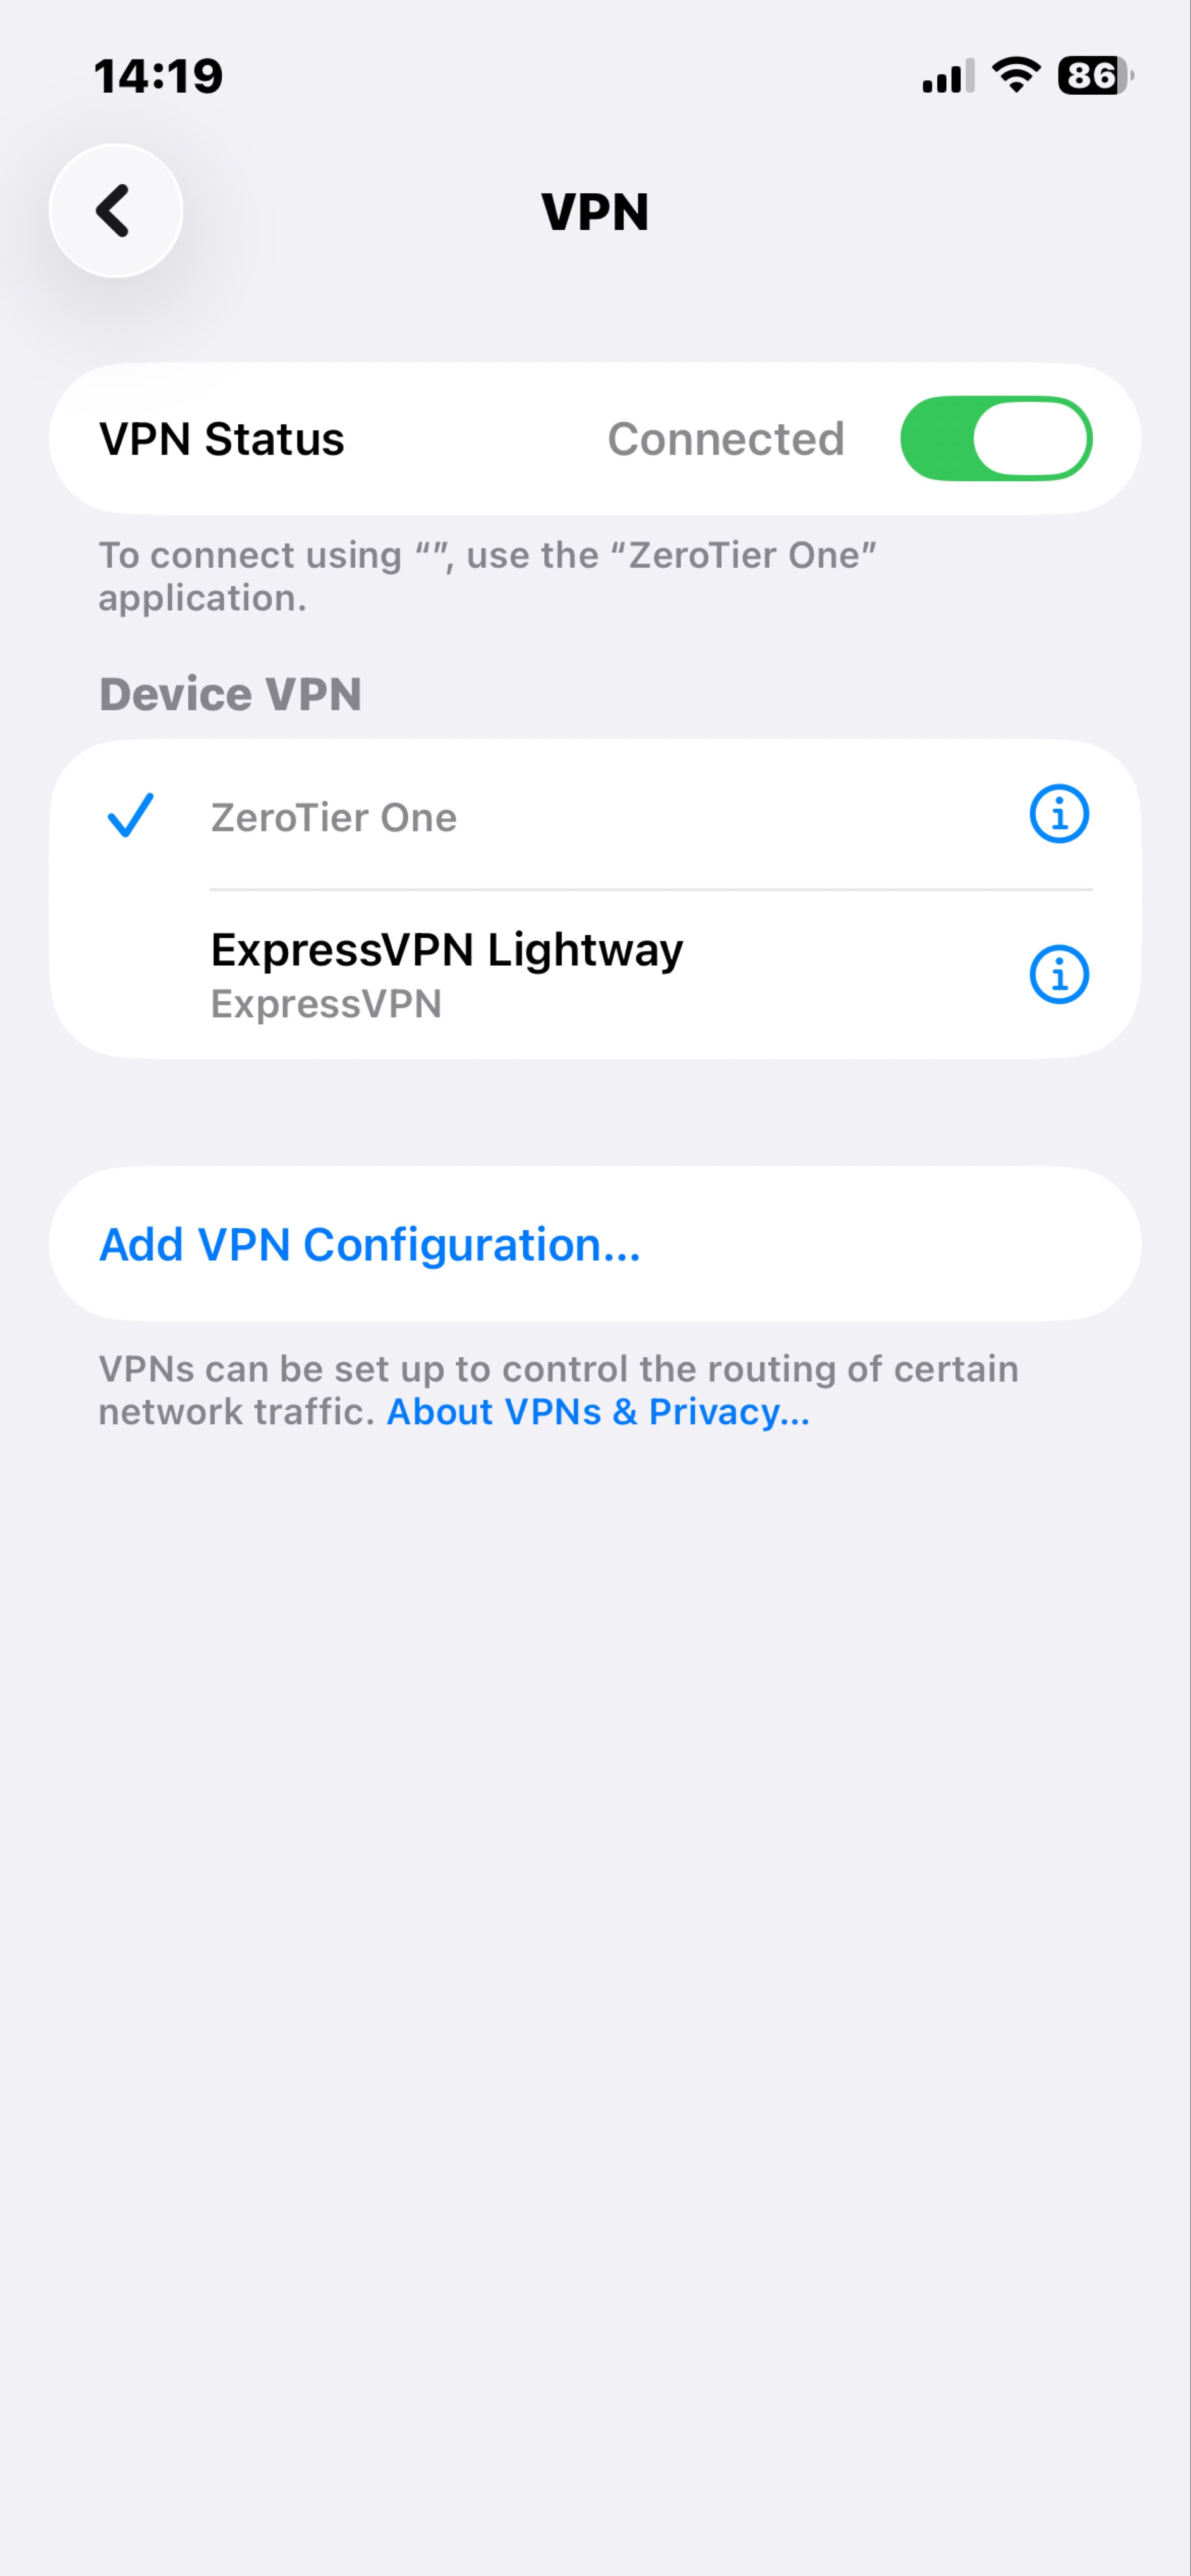
Step 2: Enable ZeroTier VPN in iOS Settings
This is the step that's commonly overlooked. Open the iOS Settings app (not the ZeroTier app) and navigate to Settings → General → VPN & Device Management → VPN. You should see 'ZeroTier One' listed under 'Device VPN'. Tap on ZeroTier One and toggle the 'VPN Status' switch to ON. The status should change to 'Connected' with a green toggle. You'll see a VPN icon appear in your iPhone status bar. Without this step, ZeroTier will not route any traffic, and you won't be able to connect to servers on your ZeroTier network.
Verifying Your ZeroTier Connection
After enabling the VPN in Settings, go back to the ZeroTier One app. Your network should now show as 'OK' or 'Connected' with a green status indicator. In ZeroTier Central (the web dashboard at my.zerotier.com), you should see your iPhone listed as an authorized member of your network with an assigned IP address. You can test connectivity by opening VybeCoding and trying to SSH to a server using its ZeroTier IP address instead of its public IP.
Common Mistakes and Troubleshooting
The most common mistake is completing step 1 (installing the app and adding the network) but skipping step 2 (enabling the VPN in iOS Settings). Users often think the app configuration alone is sufficient. Another common issue is not authorizing the device in ZeroTier Central, after your iPhone appears in the members list, you must check the 'Auth?' checkbox to allow it to join the network. If the VPN keeps disconnecting, check that you don't have conflicting VPN configurations or network restrictions. Some cellular carriers or corporate networks may block VPN traffic. If you're connected to ZeroTier but can't reach your servers, verify that your server's ZeroTier client is running and authorized, and check firewall rules on both the server and in ZeroTier Central flow rules.
Using ZeroTier with VybeCoding
Once ZeroTier is properly configured, you can add servers to VybeCoding using their ZeroTier IP addresses (typically in the 10.x.x.x range, depending on your network configuration). This allows you to SSH to your home server from anywhere with internet access, without port forwarding, dynamic DNS, or exposing SSH to the public internet. The connection is encrypted end to end by both ZeroTier and SSH. ZeroTier creates a private network layer, and SSH provides the authentication and session encryption on top of that.
Security Best Practices
While ZeroTier adds a security layer by hiding your servers from the public internet, you should still follow SSH security best practices: use SSH key authentication instead of passwords, keep your ZeroTier Network ID private, regularly review authorized devices in ZeroTier Central and remove old or unused devices, enable two-factor authentication on your ZeroTier account, and consider setting up ZeroTier flow rules to restrict which devices can communicate with each other. ZeroTier is not a replacement for proper SSH security, it's an additional layer that provides network-level isolation.
Frequently asked questions
Why isn't ZeroTier working even though I installed the app?
Installing the ZeroTier One app is only half the setup. You must also enable ZeroTier as a VPN in iOS Settings → General → VPN. Without this second step, ZeroTier won't route any traffic, and you won't be able to connect to servers on your ZeroTier network.
Do I need to keep the ZeroTier app open for it to work?
No. Once ZeroTier is enabled as a VPN in iOS Settings, it runs in the background even when the ZeroTier One app is closed. The VPN icon in your status bar indicates that ZeroTier is active.
Will ZeroTier drain my iPhone battery?
ZeroTier has minimal battery impact when idle. It only actively routes traffic when you're accessing resources on your ZeroTier network. You can disable the VPN in Settings when you don't need remote access to conserve battery.
Can I use ZeroTier with VybeCoding's auto-discovery feature?
VybeCoding's mDNS auto-discovery works on your local network. For ZeroTier connections, you'll need to manually add servers using their ZeroTier IP addresses, as ZeroTier creates a virtual network layer that doesn't broadcast mDNS.
Ready to try vibe coding from your phone?
Download VybeCoding